在本教程中,我们将向您展示如何在 Ubuntu 16.04 上安装和配置 Ntopng。 对于那些不知道的人来说,如果您希望监控服务器上的不同网络协议,Ntopng 是一个相对有用的工具。 它提供了一堆工具来监控各种协议、流量变体,是的,跨多个时间框架的带宽。 Ntopng 基于 libpcap,它以可移植的方式编写,以便在每个 Unix 平台、MacOSX 和 Win32 上虚拟运行。
本文假设您至少具备 Linux 的基本知识,知道如何使用 shell,最重要的是,您将网站托管在自己的 VPS 上。 安装非常简单,假设您在 root 帐户下运行,如果不是,您可能需要添加 ‘sudo‘ 到命令以获取 root 权限。 我将向您展示在 Ubuntu 16.04 LTS (Xenial Xerus) 服务器上逐步安装 Ntopng。
在 Ubuntu 16.04 上安装 Ntopng
步骤 1. 首先,通过检查来检查 Universe 存储库是否已启用/etc/apt/sources.list‘ 与您最喜欢的编辑器一起使用。
sudo gedit /etc/apt/sources.list
如果未包含 Universe,则修改文件以使其包含:
deb https://us.archive.ubuntu.com/ubuntu xenial main universe
步骤 2. 安装 Ntopng。
要安装 Ntopng,请以服务器的 root 用户身份运行以下命令:
sudo apt-get install redis-server sudo apt-get install ntopng
步骤 3. 配置 Ntopng。
创建一个 Ntopng 配置文件,在本文中,我们使用 nano 作为文本编辑器。 你可以使用你喜欢的文本编辑器来创建 Ntopng 配置文件:
sudo nano /etc/ntopng/ntopng.conf
# /etc/ntopng/ntopng.conf # # The configuration file is similar to the command line, with the exception that an equal # sign '=' must be used between key and value. Example: -i=p1p2 or --interface=p1p2 For # options with no value (e.g. -v) the equal is also necessary. Example: "-v=" must be used. # # # -G|--pid-path # Specifies the path where the PID (process ID) is saved. # -G=/var/tmp/ntopng.pid # # -e|--daemon # This parameter causes ntop to become a daemon, i.e. a task which runs in the background # without connection to a specific terminal. To use ntop other than as a casual monitoring # tool, you probably will want to use this option. # -e= # # -i|--interface # Specifies the network interface or collector endpoint to be used by ntopng for network # monitoring. On Unix you can specify both the interface name (e.g. lo) or the numeric # interface id as shown by ntopng -h. On Windows you must use the interface number instead. # Note that you can specify -i multiple times in order to instruct ntopng to create multi‐ # ple interfaces. # -i=1 # # -w|--http-port # Sets the HTTP port of the embedded web server. # -w=3000 # # -m|--local-networks # ntopng determines the ip addresses and netmasks for each active interface. Any traffic on # those networks is considered local. This parameter allows the user to define additional # networks and subnetworks whose traffic is also considered local in ntopng reports. All # other hosts are considered remote. If not specified the default is set to 192.168.1.0/24. # # Commas separate multiple network values. Both netmask and CIDR notation may be used, # even mixed together, for instance "131.114.21.0/24,10.0.0.0/255.0.0.0". # -m=192.168.1.0/24 # # -n|--dns-mode # Sets the DNS address resolution mode: 0 - Decode DNS responses and resolve only local # (-m) numeric IPs 1 - Decode DNS responses and resolve all numeric IPs 2 - Decode DNS # responses and don't resolve numeric IPs 3 - Don't decode DNS responses and don't resolve # -n=1 # # -S|--sticky-hosts # ntopng periodically purges idle hosts. With this option you can modify this behaviour by # telling ntopng not to purge the hosts specified by -S. This parameter requires an argu‐ # ment that can be "all" (Keep all hosts in memory), "local" (Keep only local hosts), # "remote" (Keep only remote hosts), "none" (Flush hosts when idle). # -S= # # -d|--data-dir # Specifies the data directory (it must be writable). Default directory is ./data # -d=/var/tmp/ntopng # # -q|--disable-autologout # Disable web interface logout for inactivity. # -q=
创建 ntopng.start 文件:
sudo nano /etc/ntopng/ntopng.start ##Add this line## --local-networks "192.168.0.0/24" ## give your local IP Ranges here. --interface 1
要查看所有可用的接口和选项,请使用 ntopng -h 选项:
sudo ntopng -h
启动 Ntopng 服务器守护进程:
systemctl start ntopng.service systemctl start redis-server.service
步骤 4. 测试 Ntopng。
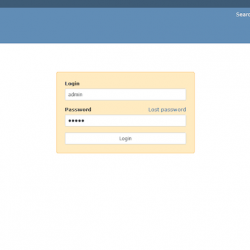
现在您可以通过键入来测试您的 Ntopng 应用程序 https://your-domain:3000. 您将看到 Ntopng 登录页面。 第一次,您可以使用 user ‘admin’和密码’admin’。
恭喜! 您已成功安装 Ntopng。 感谢您使用本教程在您的 Ubuntu 16.04 系统上安装 Ntopng 高速基于 Web 的流量分析和流量收集。 如需其他帮助或有用信息,我们建议您查看 Ntopng 官方网站.